正文
(详细)Eclips+jsp+servlet+mysql+登录实例+源代码

 提示:扫一扫查出行
【扫一扫了解最新限行尾号】
复制提示
欢迎任何形式的转载,但请务必注明出处。
该教程较全,从软件的安装以及相关的环境配置我都放置了相关教程的链接,读者可直接点击进入。自己写电商网站作业时查找了很多资料,但都不是很全,所以趁着寒假写了这份教程,也对自己所学的内容总结总结。如果一些地方读者看不懂,可以自行翻阅我的其他教程内容或私信我,我可能忘放链接了。还有一些专业名词请问度娘。
必做:
- jdk、Eclipse、mysql 安装以及环境配置(点击进入教程1)
- java连接mysql驱动程序:connector/J (点击进入教程2)
- 在Eclipse配置Tomcat服务器(点击进入教程3)
本节内容
- 新建项目
- 结构图
- 数据库MySQL
- 登录页面Login.jsp
- java类编写
- xml编写
- 完善Login.jsp
- 效果展示
一、新建项目
Dynamic WEB项目 “MyWeb”
点击进入教程3 实例部分
二、结构图
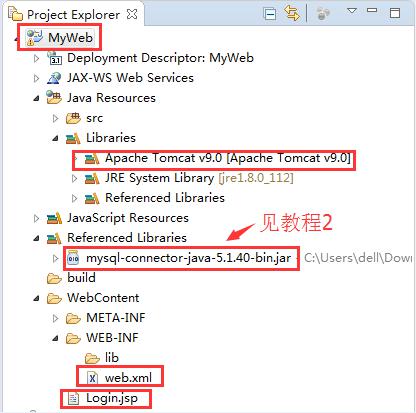
新建JSP页面"Login"里面的各项,保证红框部分都没丢
三、数据库
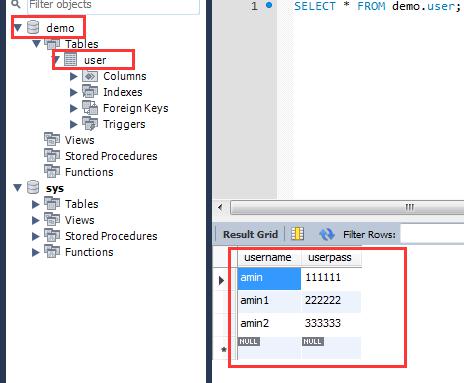
数据库的编写我略掉了,读者自己编写时请和我的数据库名称以及表名一致。或者在Connsql中修改代码(Eclipse连接Mysql我前面有具体文章)
四、登录页面Login.jsp
servlet完成后此块还要完善
<%@ page language="java" contentType="text/html; charset=UTF-8" pageEncoding="UTF-8"%> <!DOCTYPE html PUBLIC "-//W3C//DTD HTML 4.01 Transitional//EN" "http://www.w3.org/TR/html4/loose.dtd"> <html> <head> <meta http-equiv="Content-Type" content="text/html; charset=UTF-8"> <title>登录</title> </head> <body> <form method="" action="" > <!-- 用户名--> <label for="userName">用户名</label> <input type="text" name="userName"/><br> <!-- 密码--> <label for="passWord">密码</label> <input type="password" name="passWord" /><br><br> <!-- 登录 --> <input type="submit" value="Sign Up"></input> </form> </body> </html>
五、java类编写
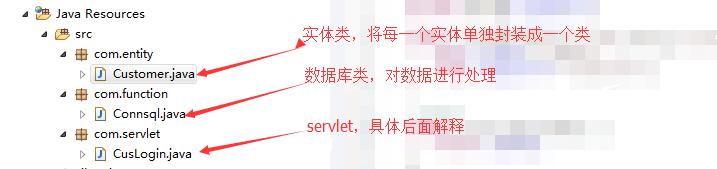
package com.entity; public class Customer { private String cusname; private String cuspassword; public Customer(String cusname,String cuspassword){ this.cusname = cusname; this.cuspassword = cuspassword; } //会员名字 public String getCusname() { return cusname; } public void setCusname(String cusname) { this.cusname = cusname; } //会员密码 public String getCuspassword(){ return cuspassword; } public void setCuspassword(String cuspassword){ this.cuspassword = cuspassword; } }
package com.function; import java.sql.DriverManager; import java.sql.ResultSet; import java.sql.SQLException; import com.entity.Customer; import com.mysql.jdbc.Connection; import com.mysql.jdbc.PreparedStatement; public class Connsql { /**************连接数据库部分********************/ public static Connection conn(){ Connection conn = null; String driver = "com.mysql.jdbc.Driver"; String url = "jdbc:mysql://localhost:3306/demo?characterEncoding=utf-8&useSSL=false"; String username="root"; String pw = "111111"; try { Class.forName(driver);//加载MySql的驱动类 System.out.println("成功加载驱动程序!!!!"); conn = (Connection) DriverManager.getConnection(url,username,pw);//创建数据库的连接 } catch (Exception e) { // TODO: handle exception System.out.println("找不到驱动程序类 ,加载驱动失败!"); e.printStackTrace(); } return conn; } /**************用户登录********************/ public boolean cusLogin(Customer customer){ Connection conn = conn(); PreparedStatement pstmt = null;//创建一个Statement ResultSet rs = null; //创建结果集 String sql = "select * from user where username = ? and userpass= ? ";//创建SQL语句 boolean bl = false; try{ pstmt = (PreparedStatement) conn.prepareStatement(sql); pstmt.setString(1, customer.getCusname()); //设置'?'值 pstmt.setString(2, customer.getCuspassword());//设置'?'值 rs = pstmt.executeQuery(); //执行SQL语句 if(rs.next()){ //处理结果 System.out.println("用户名密码正确"); bl = true; } rs.close(); //关闭记录集 pstmt.close(); //关闭声明 conn.close(); //关闭连接对象 }catch(SQLException e){ e.getStackTrace(); } return bl; } }
package com.servlet; import java.io.IOException; import javax.servlet.ServletException; import javax.servlet.http.HttpServlet; import javax.servlet.http.HttpServletRequest; import javax.servlet.http.HttpServletResponse; import com.entity.Customer; import com.function.Connsql; public class CusLogin extends HttpServlet { private static final long serialVersionUID = 1L; public CusLogin() { super(); // TODO Auto-generated constructor stub } protected void doGet(HttpServletRequest request, HttpServletResponse response) throws ServletException, IOException { try{ request.setCharacterEncoding("UTF-8"); response.setCharacterEncoding("UTF-8"); //表单数据获取 String name = request.getParameter("userName"); String password = request.getParameter("passWord"); Customer customer = new Customer(name, password); //数据库部分 Connsql sql = new Connsql(); //新建数据库连接 boolean bl =sql.cusLogin(customer); //检查用户名 if(bl){ //登录成功 response.sendRedirect("Login.jsp?loginerror=no"); //将失败响应传递给Login.jsp System.out.printf("success"); }else{ //登录失败 response.sendRedirect("Login.jsp?loginerror=yes"); //将失败响应传递给Login.jsp System.out.printf("faild"); } }catch(Exception ex){ ex.printStackTrace(); } } protected void doPost(HttpServletRequest request, HttpServletResponse response) throws ServletException, IOException { // TODO Auto-generated method stub doGet(request, response); } }
六、编写web.xml
打开web.xml在内容里添加如下代码
<servlet> <servlet-name>CusLogin</servlet-name> <servlet-class>com.servlet.CusLogin</servlet-class> </servlet> <servlet-mapping> <servlet-name>CusLogin</servlet-name> <url-pattern>/CusLogin</url-pattern> </servlet-mapping>
七、完善Login.jsp
1.于<form>中补充action
<form method="get" action="CusLogin"
2.于</html>底部增加<script>,接受响应
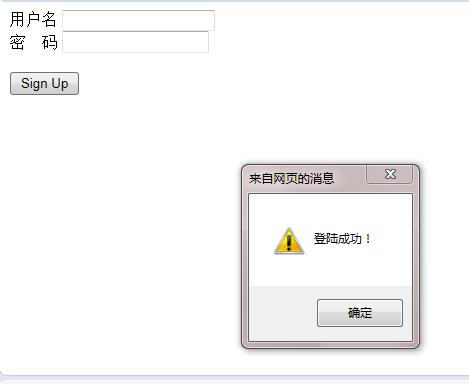
<script>//取出传回来的参数error并与yes比较 var error ='<%=request.getParameter("loginerror")%>'; if(error=="yes"){ alert("用户名或密码错误!"); //弹框:登陆失败 } else if(error=="no"){ alert("登陆成功!"); //弹框,登陆成功 }</script>
八、效果展示